
🏘️ Tenancies Screen Overview
The Tenancies screen displays a chronological grid of all tenancies associated with the current Contact or Property.
🔍 Accessing the Tenancies Screen
You can access this screen via:
-
The Contact or Property screen by clicking the Tenancies icon
-
The Tenancy List screen by clicking the Tenancy button
-
If a Pre-Tenancy has already been created, you can convert it to a Current Tenancy using the available option
🧭 Setting Up a Tenancy
To create a tenancy, ensure the following records are set up:
-
Tenant (Purchaser)
-
Property
-
Landlord (Vendor)
Both the Tenant and Landlord are linked via the Property.
⚡ Quick Start Guide
🔄 Converting a Pre-Tenancy to a Current Tenancy
-
Locate the Property or Tenant
-
Click Tenancies, right-click and choose Change to Current Tenancy
-
This option is also available from the Tenancy List screen
➕ Adding a New Tenancy
-
Locate the Property or Tenant
-
Click Tenancies or use the Tenancy List
-
Select New Tenancy and follow the guided steps (See: Add New Tenancy guide)
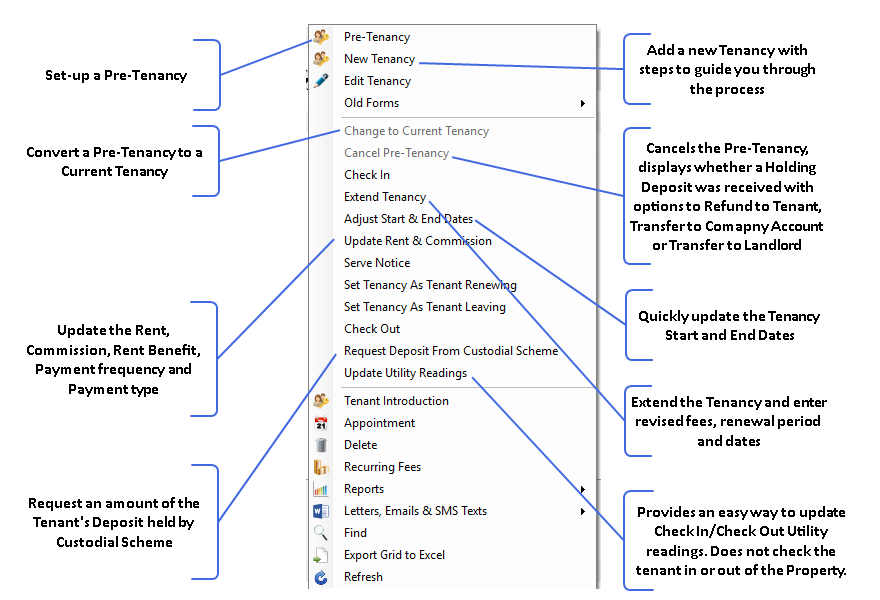
🧰 Tenancy Options (Right-Click Menu)
Once a Pre-Tenancy or Tenancy is created, the following options may appear:
-
New Tenancy
-
Edit Tenancy
-
Change to Current Tenancy – opens the New Tenancy screen
-
Cancel Pre-Tenancy – includes deposit handling options and remarketing
-
Check In – enter meter readings and check-in date
-
Extend Tenancy
-
Adjust Start & End Dates – make minor date changes
-
Update Rent & Commission
-
Serve Notice
-
Set Tenancy as Tenant Renewing
-
Set Tenancy as Tenant Leaving
-
Check Out – performs tenancy check-out
-
Update Utility Readings
-
Send to Tenant Shop
-
Tenant Introduction
-
Request Deposit from Custodial Scheme – appears if deposit is held by a custodial scheme
-
Appointment – opens the diary screen with property details pre-filled
-
Delete Tenancy
-
Recurring Fees – set up fees like Ground Rent or Service Charges
🔧 Additional Tenancy Options
🔌 Update Utility Readings
Displays the Check-In and Check-Out meter readings, enabling users to manually update them.
Note: This does not check the tenant in or out of the property.
📅 Appointment
Opens the Diary screen to schedule an appointment. The appointment will be pre-filled with details from the selected property.
🗑️ Delete Tenancy
Allows you to permanently delete a tenancy record.
🔁 Recurring Fees
Set up recurring charges such as Ground Rent or Service Charges for the tenancy.
📊 Reports
Provides access to key tenancy-related reports:
-
Tenancy List
-
Tenancy Analysis
-
Tenancy Commission
🏦 Request Deposit from Custodial Scheme
This option is available for tenancies where Deposit Held By is set to Custodial Scheme. It allows you to request the deposit directly from the scheme.
✉️ Communication & Display Tools
📬 Letters, Emails & SMS Texts
This section provides a range of communication options for both landlords and tenants:
-
Produce Address Labels
-
For Landlords
-
For Tenants
-
-
Send Letters
-
To Landlords
-
To Tenants
-
-
Send Emails
-
To Landlords
-
To Tenants
-
-
Email Certificates
-
To Tenants
-
-
Send SMS Texts
-
To Landlords
-
To Tenants
-
These tools allow for efficient, targeted communication directly from the tenancy interface.
🗺️ Viewing Mode
Switch to Map View to visually browse properties and tenancies by location.
🔍 Find
Use the Find field to search for specific text or records within the screen.
📤 Export Grid to Excel
Export all grid data to Microsoft Excel for reporting, analysis, or record-keeping.
🔄 Refresh Button
Clicking Refresh ensures the latest applicant and tenancy information is displayed.
🧮 Filter Rows
Enable or disable the Filter Rows column to:
-
Select multiple contacts
-
Apply bulk actions such as sending letters, emails, or SMS texts to multiple recipients
📝 Tenancy Setup & Configuration Notes
💳 Rent Due Transactions
-
When a Tenancy is saved, Rent Due Transactions are automatically created for the tenant based on the defined Payment Schedule.
-
These transactions are processed on their Due Date using the Process Tenant Payments function.
-
If the tenancy is edited and extended, additional Rent Due Transactions will be generated to reflect the new term.
🏦 Deposit Handling
-
The Deposit Held setting in System Configuration determines where the deposit is stored:
-
Tenant’s Deposit Account (default)
-
Landlord’s Account (if configured)
-
🏠 Tenant Address Updates
-
When adding a tenancy, the tenant’s address is updated to match the property address.
-
If the Start Date is in the future, the address will automatically update on that date.
🧾 Additional Fees Configuration
-
Products used for additional fees (e.g. renewal charges, service fees) can be configured in:
System Configuration → Letting → Products
🛡️ TDS Deposit Scheme ID
-
Once you receive your TDS ID, enter it by:
-
Navigating to the Tenant
-
Clicking Tenancies
-
Double-clicking to Edit the tenancy
-
Inserting the Deposit Scheme ID
-
🧭 Legacy Tenancy Setup
-
To use the old tenancy setup screens, right-click on the tenancy and select Old Forms.
Note: These screens are deprecated and will not be supported in future versions of Acquaint.