
Some banks can produce a banking payment file which lists your payments this can be imported into Acquaint which will match the contacts and the transactions and make payments and debits to their accounts accordingly, it is important to perform this process with care.
This supports files from:
-
Barclays Bank
-
HSBC
-
Lloyds Bank
-
Royal Bank of Scotland
-
QuickBooks
-
Natwest
-
Natwest Bankline Statement
-
Bank of Ireland Statement
-
Co-operative Bank
-
Allied Irish Bank (AIB)
-
Custom - this option provides the ability for banking file fields to be mapped to meet your file requirements
Importing a bank file
-
From the Financial tab click Import Banking File*
-
The Bank Account field will default to the Client Account for the default Company for your current Site/Branch.
-
At the File Format field select the file. On option is available for custom mapping of bank files*
-
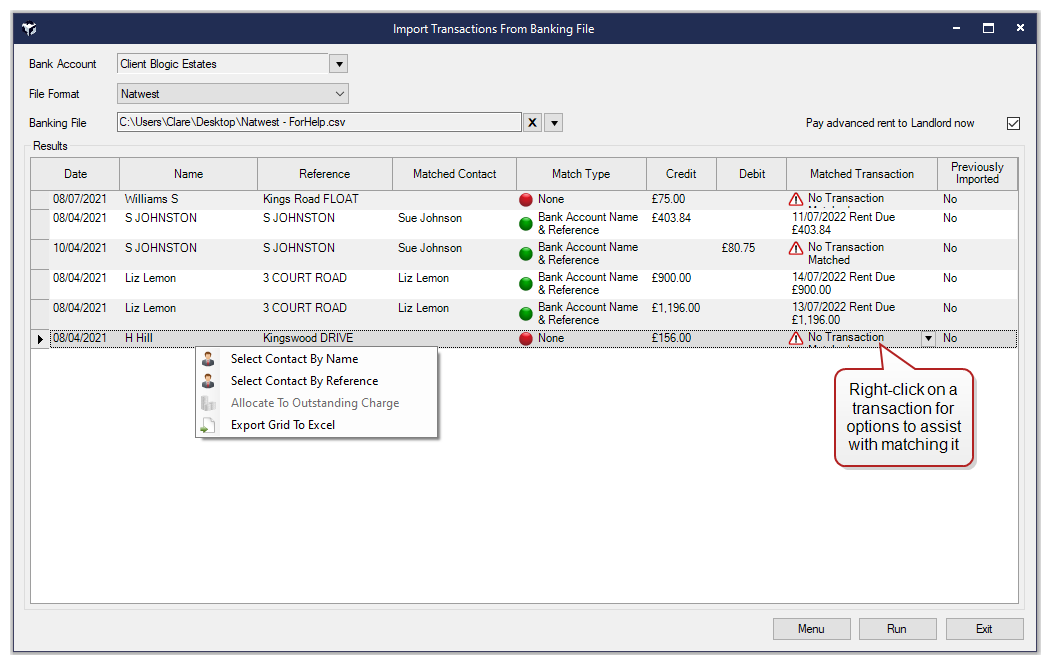
At the Banking File field screen click the drop-down file and select the file. After selecting a Banking File, Acquaint will read the file and attempt to match the contacts and transactions. The results will be displayed (see our example below).
-
Pay advanced rent to Landlord now:
-
If Pay Advanced Rent to Landlord option is ticked, any credit allocated to future Rent Due transactions will appear on the Landlord's account with the received date of the credit.
-
If Pay Advanced Rent to Landlord option is unticked when the Run button is clicked, any credit allocated to future Rent Due transactions will appear on the landlord's account with the due date of the Rent Due charge.
-
For unmatched transactions or to change matched ones you can right-click on a transaction and Select the Contact By Name or Reference to help match them up. You can also right click on a Credit to manually Allocate To Outstanding Charge or right click on a Debit to Assign To Payment.
-
Click Run and the transactions will be imported.
* This will only be enabled for users with the Accounts -> New Permission
Custom field mapping for Banking files
On the Import Transactions from Banking File screen choose the option of Custom.
When selected this a Custom Banking File Field Mappings screen will appear, allowing you to specify which row the headers start on and the positions of each column to match the data in your file. These will default to N/A.
As a minimum, you will need to map the following:
-
Date
-
Reference
-
Amount or Credit & Debit
When clicking Save, the selected position will be saved against company configuration records for the Company the Bank Account is linked to. Select the Banking file as per the remaining steps for importing a bank file.
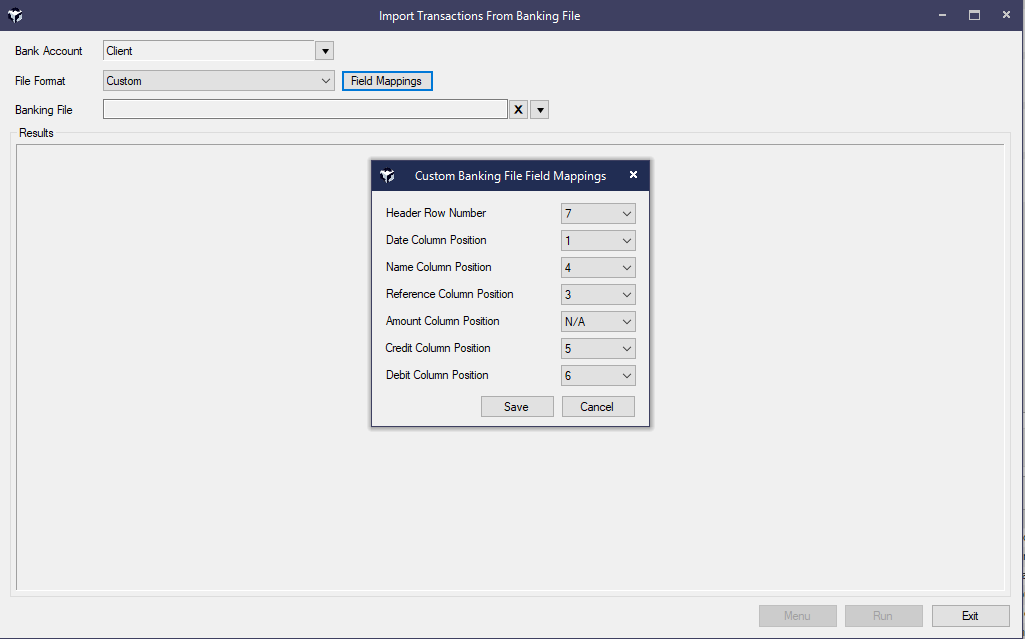
Clicking the Field Mappings button will display the Custom Banking File Field Mappings screen.