
✨ Marketing Email Designer in Acquaint
The Marketing Email Designer allows you to create visually engaging, branded marketing emails and newsletters. With customisable colours, menu items, adverts, and social media links, you can design stunning campaigns and send them en masse to your contacts.
📧 Email Types in Acquaint
Marketing emails are defined by their Email Template Type:
-
Property Bulletin
-
Property Details
-
Property Development Details
Newsletters are emails containing news items and must be set to the Newsletter type.
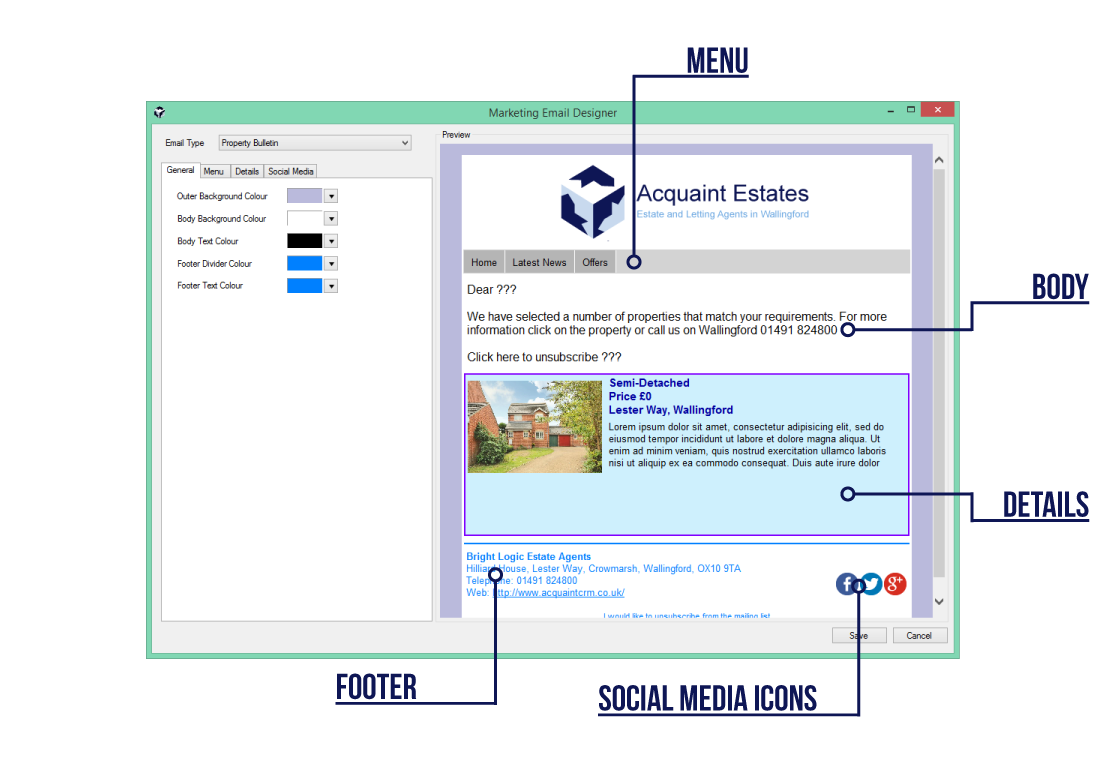
🎨 Customising Emails with the Designer
To access the designer:
Go to Marketing Tools → Marketing Email Designer
Steps to Customise:
-
Select an Email Type from the drop-down list
-
Example: Property Bulletin
-
-
Use the tabs to customise design elements:
-
General – Set overall colours and layout
-
Menu – Add clickable links to external content
-
Details – Customise the property details section
-
Body – Displays the main content from your email template
-
Social Media – Add links to your social media pages (e.g. Facebook, Twitter)
-
Enter URLs next to each platform
-
The World icon will activate and preview icons will appear
-
Use the Icon Style drop-down to change icon appearance
-
-
-
The Footer is automatically populated from:
File → Configuration → Site/Branch Configuration → Site Details -
Use the Preview panel to see changes in real time
-
Click Save to apply your design
📺 Watch the tutorial
🔗 Adding Menu Items and Adverts
Menu Items and Adverts enhance your emails with clickable links and promotional content.
Access via:
-
File → Configuration & Administration → Templates → Marketing Email Items
-
Or Marketing Tools → Marketing Email Items icon
🛠️ Step 1: Create Items and Adverts
-
Click New
-
Select Type: Menu Item or Advert
-
Enter the URL – the destination link for the item
-
For Adverts:
-
Add text in the Body field
-
Choose an image using the Image field and navigation arrows
-
-
Click Save
🧩 Step 2: Assign Items to Email Templates
-
Go to:
Configuration → Templates → Emails -
Select or create an Email Template
-
Ensure the Type is set to one of the following:
-
Property Bulletin
-
Property Details
-
Property Development Details
-
Newsletter
-
-
-
Add Menu Items:
-
Click Menu → New
-
Select the item and set its Order (position in the menu bar)
-
-
Add Adverts:
-
Click Menu → New
-
Select the advert and set its Order
-
-
Add Email Items:
-
Click Menu or right-click → New
-
Select the item and define its display order
-
-
Preview the email under the Preview tab
-
Click Save
📰 Step 3: Adding News Items to Newsletters
News items can be added to Newsletter-type Email Templates.
Prerequisites:
-
News items must be created in Web Site News
-
They must be uploaded to the web server using Web Upload
Steps:
-
Go to:
Configuration → Templates → Emails -
Select your Newsletter Email Template
-
Ensure the Type is set to Newsletter
-
This will enable the Newsletter Articles tab
-
-
Under the News Articles tab:
-
Click Menu → New
-
Select from available news items
-
If none appear, ensure they’ve been created and uploaded
-
-
Click Save
💡 Note: You must save the Newsletter template before adding news items.